本文共 5198 字,大约阅读时间需要 17 分钟。
上周小组讲课讲的有this的指向,所以今天将上次讲课的知识点整理了一遍,再回忆一下。
this指向:在绝大多数情况下,函数的调用方式决定了this的值(运行时绑定),通俗的说,谁调用了我,我就指向谁。
1.首先了解window是浏览器对象
BOM的概述 browser object modal :浏览器对象模型。 浏览器对象:window对象。 Window 对象会在<body> 或 <frameset> 每次出现时被自动创建。
我们经常在js中调用一个函数通常是函数名加(),其实本质上是window.函数;例如:
var a=1;console.log(a);//输出为1console.log(window.a);//输出为1
2.现在开始说this,如刚开始所说,this的指向可以说是谁指向了我,我就指向谁,跟我们指向的地址去找this。
先来一个例子结合上一条对this进行一下了解function typeOne(a){ console.log('1 在html标签内声明函数,该方法this为:') console.log(this);}typeOne(1);//此时的输出结果为window,typeOne(1),可以写成window.typeOne(1)的形式。所以是window调用的函数,this就指向window。 2.1三种函数调用来讨论this指向
2.1.1:纯粹的函数调用function func() { console.log( this.a );}func();window.func();//undefined --this指向windowconsole.log(window.a); 这两个的输出都是undefined,window.func()中的this指向的是window,与func()一样。为什么结果是undefin呢?
这是因为this指向的是window,而window.a就相当于在全局定义了一个a的变量,但是没有进行赋值,所以输出的结果为undefined.
现在我们将a进行赋值
var a=5;function func() { console.log( this.a );}window.func();//undefined --this指向windowconsole.log(window.a);console.log(window); 此时的输出结果都为5,这是因为我们在全局定义了一个a变量,并且对a进行了赋值,所以此时window是由a这个属性的,他的属性值就是5,输出的window中有a这个属性,属性值为5
2.1.2:作为对象方法调用function func() { console.log( this.a );}var obj = { a: 42, func:func};obj.func();window.obj.func(); // 42 -- this指向obj 这种方式是obj调用的func(),此时obj中有属性a,且a的值为42,所以输出的结果为42
我们在上一段代码的基础上,加上这一段代码
var obj2={ a: 66, obj: obj}obj2.obj.func() //如果有多个对象调用我,那我就指向最后一个,即obj 此时可以理解为是obj2调用obj,obj调用func(),所以还是obj调用func(),所以结果为42
2.1.33.作为构造函数调用 构造函数就是通过这个函数可以生成一个新的对象,这是,this就指这个新对象。function test() { this.x = 1; console.log(this.x)}var obj = new test();obj// 1 这种方法obj对象中有x属性所以输出为1
var x=2;function test() { console.log(this.x)}var obj = new test();obj// undefined 这种方法得到结果为undefined,这是因为obj这个对象中有test函数,没有a独享,是obj调用的test()函数,所以为undefined
var x=2;function test() { this.x=1 console.log(this.x)}var obj = new test();obj// 1 这样子就更好理解了
2.2:通过三种方式对DOM节点添加点击事件 2.2.1.第一种方式:内敛方式 在html标签内声明函数 html代码为js代码为
function typeOne(){ console.log('1 在html标签内声明函数,该方法this为:') console.log(this);} 此时指的对像为window对象
这是因为点击按钮的时候,相当于执行了typeOne()函数,此时函数的执行范围是全局对象window,此时还是window调用了这个函数,所以this指向的还是window对象
2.2.2.第二种方式 :动态绑定,在js中为DOM对象绑定onclick事件two.onclick=function(){ console.log('2 onclick直接绑定,该方法this为:'); console.log(this);}; 此时的输出结果为 button标签,此时this指向的是DOM对象,这是因为我们对DOM对象中的onclick属性赋值了一个函数,此时是DOm对象调用的这个函数,所以this指向的是DOM对象。这种绑定事件,只能绑定一次,如果多次绑定就会覆盖。
two.onclick=function(){ console.log('2 onclick直接绑定,该方法this为:'); console.log(this);};two.onclick=function(){ console.log('2 onclick直接绑定,第二次绑定,该方法this为:'); console.log(this);}; 此时输出的结果为第二次绑定,this输出还是button。
下面在js中对DOM对象绑定事件的内部调用函数来判断该内部的this指向。
two.onclick=function(){ function f1(){ console.log('2.1 onclick直接绑定且函数内部来调用其他函数,该方法this为:'); console.log(this) }; f1(); function f2(){ console.log('2.2 onclick直接绑定且函数内部来调用其他函数,该方法this为:'); console.log(this) }; f2();}; 两次的输出结果,对象都是指向的window,因为在内部依旧是window.f1(),window.f2()调用函数,所以输出的this是window。
2.2.3.第三种方式:使用监听事件进行绑定function typeThree(){ console.log('3 addEventListener第一次绑定,该方法this为:'); console.log(this);}three.addEventListener('click',typeThree) 此时输出的结果为button,this指向的是DOM对象,监听事件也是像DOm对象中的onclick属性赋值一个函数,此时是DOM对象调用这个函数和,this指向DOM对象。
下面对this谁指向我,我就指向谁的结合例子,依据地址来进行解析。代码如下function fn() { console.log(this.a );}var obj = { a: 2, fn: fn};var bar = obj.fn; //只是把fn赋值给bar,而决定 this 的值的是?var a = "我是全局的a";bar(); 此是输出的结果为‘我是全局的a’,这是为什么呢。我们从根源上说起
首先,我们在js中声明了一个fn()函数,此时fn()函数有一个它自己的地址。我们对obj对象中的fn属性赋值了一个函数fn(),实际上是将fn()函数的地址赋值给了obj中fn属性。
而后,我们在全局定义了一个bar对象,我们将obj.fn赋值给了bar,因为obj.fn实际上是fn函数的地址,所以此时我们也将fn的地址赋值给了bar。
而,bar()是window对其进行调用,我们又在全局中定义了一个a属性,并将其进行了赋值,所以此时window对象中有a属性,此时的bar()函数与fn()函数的地址一样,调用bar函数可以说成是window调用了bar函数,也可以说成是window调用fn函数,此时window中有属性a,且他的属性值为“我是全局中的a”.
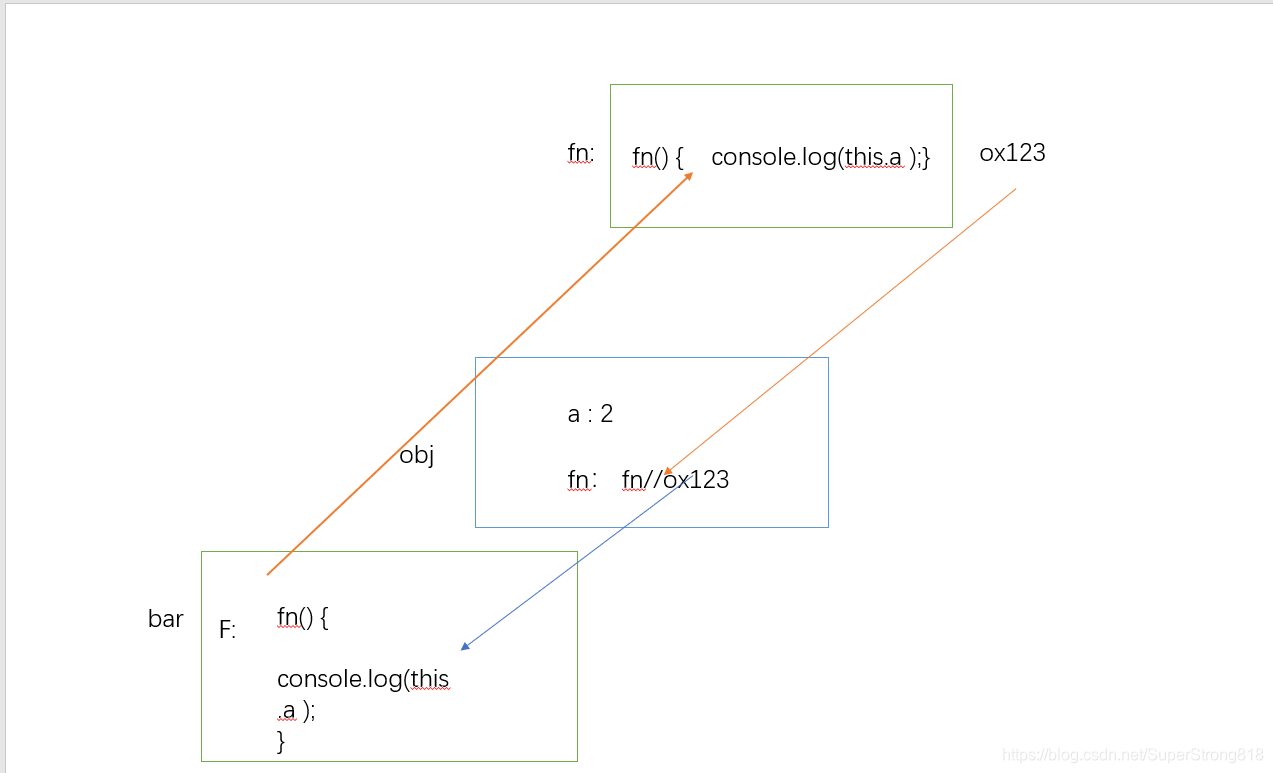
所以,最终的输出结果为我是全局中的a
2.3:定时器中的this指向var obj = { a: 42, func:function func () { console.log(this.a); }};setTimeout(obj.func, 1000); 输出的结果为undefined 这是因为setTimeout()调用的代码运行在与所在函数完全分离的执行环境上。这会导致这些代码中包含的 this 关键字会指向 window (或全局)对象。
setTimeout(function(){ obj.func()}, 1000);//42setTimeout('obj.func()', 1000);//42 这两行代码执行的结果都是42
setTimeout('console.log("aaa")', 1000);//aaa 第二种传字符串那种,执行的是一行代码。
2.4.箭头函数中的this指向 箭头函数中的this指向 箭头函数不会创建自己的this,它只会从自己的作用域链的上一层继承this,即使是call,apply,bind等方法也不能改变箭头函数this的指向window.color='red'; var o={ color:'blue', sayColor:function(){ return ()=>{ console.log(this.color)}; } }; var sayColor = o.sayColor(); sayColor();//结果为blue sayColor中没有color,它将去找上以层继承this,此时this指向o
window.color='red'; var sayColor=()=>{ console.log(this.color) } sayColor(); 此时this指向window,函数sayColor的上一级是window,所以此时输出的结果为red
window.color='red';var o={ color:'blue', sayColor:()=>{ console.log(this.color) } }; o.sayColor();//red 此时函数o.sayColor的上一级是window,所以输出结果为red 上面那个箭头函数是写在函数里面,而这个箭头函数是函数体
window.color='red'; var o = { color: 'blue', b: () => console.log(this.color), c: function() { console.log( this.color) } } o.b(); // red o.c(); // blue 综合两种如上所示
转载地址:http://uhvqz.baihongyu.com/